 |
React.js is the new popular guy around the "JavaScript Frameworks" block, and it shines for its simplicity. Where other frameworks implement a complete MVC framework, we could say React only implements the V (in fact, some people replace their framework's V with React). React applications are built over 2 main principles: Components and States. Components can be made of other smaller components, built-in or custom; the State drives what the guys at Facebook call one-way reactive data flow, meaning that our UI will react to every change of state.
One of the good things about React is that it doesn't require any additional dependencies, making it pluggable with virtually any other JS library. Taking advantage of this feature, we are going to include it into our Rails stack to build a frontend-powered application, or you might say, a Rails view on steroids.
A mock expense tracking app
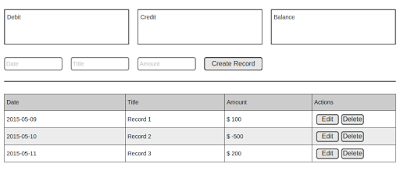
For this guide, we are building a small application from scratch to keep track of our expenses; each record will consist of a date, a title and an amount. A record will be treated as Credit if its amount is greater than zero, otherwise it will be treated as Debit. Here is a mockup of the project:
 |
- When the user creates a new record through the horizontal form, it will be appended to the records table
- The user will be able to inline-edit any existing record
- Clicking on any Delete button will remove the associated record from the table
- Adding, editing or removing an existing record will update the amount boxes at the top of the page
First things first, we need to start our brand new Rails project, we are naming it Accounts:
- rails new accounts
Once our project has been initialized, we proceed to include React. For this post I decided to include it via the official gem react-rails because we are going to take advantage of some cool features included in this gem, but there are other ways to achieve this task, like using Rails assets or even downloading the source package from the official page and pasting it into our javascripts folder.
If you have been developing Rails apps, you know how easy it is to install a gem: Add react-rails to your Gemfile.
- gem 'react-rails', '~> 1.0'
- bundle install
- rails g react:install
- //= require react
- //= require react_ujs
- //= require components
Creating the Resource
We are going to build a Record resource, which will include a date, a title, and an amount. Instead of using the scaffold generator, we are going to use the resource generator, as we are not going to be using all of the files and methods created by the scaffold generator. Another option might be running the scaffold generator and then proceed to delete the unused files/methods, but our project can turn a little messy after this. Inside your project, run the following command:
- rails g resource Record title date:date amount:float
- rake db:create db:migrate
- Record.create title: 'Record 1', date: Date.today, amount: 500
- Record.create title: 'Record 2', date: Date.today, amount: -100
Done! We're ready to write some code.
Nesting Components: Listing Records
For our first task, we need to render any existing record inside a table. First of all, we need to create an index action inside of our RecordsController:
- # app/controllers/records_controller.rb
- class RecordsController < ApplicationController
- def index
- @records = Record.all
- end
- end
- <%# app/views/records/index.html.erb %>
- <%= react_component 'Records', { data: @records } %>
You can now navigate to localhost:3000/records. Obviously, this won't work yet because of the lack of a Records React component, but if we take a look at the generated HTML inside the browser window, we can spot something like the following code
- <div data-react-class="Records" data-react-props="{...}">
- </div>
The time has come for us to build our First React component, inside thejavascripts/components directory, create a new file called records.js.coffee, this file will contain our Records component.
- # app/assets/javascripts/components/records.js.coffee
- @Records = React.createClass
- render: ->
- React.DOM.div
- className: 'records'
- React.DOM.h2
- className: 'title'
- 'Records'
NOTE: Another way to instantiate ReactComponents inside the render method is through JSX syntax. The following snippet is equivalent to the previous one:
- render: ->
- `<div className="records">
- <h2 className="title"> Records </h2>
- </div>`
You can refresh your browser now.
Written by Fernando Villalobos
If you found this post interesting, follow and support us.
Suggest for you:
Build Web Apps with React JS and Flux
Meteor and React for Realtime Apps
Modern React with Redux
Build Apps with React Native
The Complete Web Development Tutorial Using React and Redux
Hi, Very informative blog.There is so much information about the ReactJS. keep it up and thanks for the great content. Bookmarked your site.
ReplyDeleteRegards,
Ramya,
ReactJS Online Training in Hyderabad